
Description
RAM Mounts Motorcycle Fork Stem Ball Base – Features & Prices in Saudi Arabia :
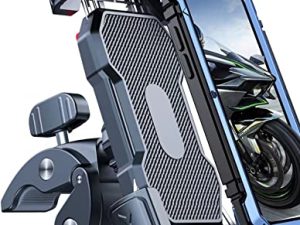
RAM Mounts Motorcycle Fork Stem Ball Base RAM-B-342U with B Size 1″ Ball for Stems 12mm to 38mm in Diameter
Product Dimensions
3 x 2 x 4 inches
Item Weight
4 ounces
ASIN
B001RHVS8I
Item model number
RAM-B-342U
Is Discontinued By Manufacturer
Yes
Special Features
Hardware Included: (1) Expansion Plug for 12mm – 38mm (.5″ – 1.49″) Fork Stem Holes, (1) M5 x 60mm Machine Screw, (1) Steel Washer Set, (1) Nut Pocket Washer Set, (1) Brass Nylock Nut
Other display features
Wireless
Colour
Black
Department
UNPKD RAM CYCLE STEM BASE W/ 1″ DIA BALL
Manufacturer
Earl & Brown – Consumer Electronics
Date First Available
January 20, 2008
Test video – RAM Mounts Motorcycle Fork Stem Ball Base :
Product highlights :
Questions & Answers – RAM Mounts Motorcycle Fork Stem Ball Base :
Technical specifications – RAM Mounts Motorcycle Fork Stem Ball Base :
Brand
RAM MOUNTS
Color
Black
Mounting Type
Handlebar
Special Feature
,
Material
Rubber
Purchase advice :
-
Warranty :
Check the duration of the warranty and also the faults and defects it covers. Is it complete or limited? and What is included in the warranty (parts, repairs or both)?
-
Shipping :
Is delivery offered? And how long does it take to get delivered (Delivery time)
-
Proof of purchase :
Does the shop give you an invoice ?
-
After-sales service :
Do they have an after-sales service to have information about the installation or operation (instructions for use). Also in case of problem, it is the seller who takes charge or you must contact the manufacturer or supplier yourself.
_____________________________

E. P (verified owner) –
A little frustrating to install but solid when finished. – I used this on a 2017 Kawasaki Concours 14. I did finally get it to work and I am happy with it now but it was a chore to get it installed. The mount works by compressing the rubber inside the fork stem. Since the lower part of the fork stem is not reachable, they employ a “gripper” / nut holder on the bottom. The instructions tell you to “pre-load’ the assembly before insertion to make sure the gripper part is snug against the rubber so that it will remain fixed, keeping the nut from spinning when you are lightning the hex screw from the top. In practice, I could not pre-load enough to get the gripper to actually grip without pre-loading so much that the rubber was distorted in such a way that it would no longer fit in the hole.
K. K (verified owner) –
Does the job, but shakes – This will do the job, but it shakes and doesn’t hold the mounted item steady. Never seems to get tight enough.
D. R (verified owner) –
How to install RAM-B-342U for 20mm stem hole – For those reviewers saying that this product didn’t fit their bike they likely have a stem hole between 20mm-28mm. Note that out of the box the included rubber stopper WILL NOT FIT without modification. The tapered end stops at ~19mm and the large end is 28mm. You will note however that on the large end of the rubber stopper there is a marked inner ring which happens to be exactly 20mm in diameter. In order to achieve a perfect fit on my motorcycle I needed to take off the excess rubber from the large part of the stopper so that it would be the diameter of this inner line. In order to trim it I used my belt sander which took about 5 minutes to shave off the excess rubber. If you don’t have a belt sander you can likely whittle the rubber away with a knife a little at a time, checking the fit often to make sure you don’t take off too much. I left the final piece of rubber in a slightly tapered cork shape so that it would be more snug at the top. Once you have it trimmed enough so that it will slide into your fork about 1/2″ snugly by hand, measure 1″ from the end of the plug and cut off the excess rubber. Any bigger and the bolt won’t catch when assembled. Next, assemble as per the included instructions. After assembly, I was able to force the entire unit by hand about 3/4″ into the stem, after which I used a rubber mallet to gently hammer the entire assembly to be flush with the fork. Next, with the mount in place, simply tighten the bolt. I have no doubt this unit will now be harder to remove than it was to install and I have complete confidence in the fit.
E. P (verified owner) –
A little frustrating to install but solid when finished. – I used this on a 2017 Kawasaki Concours 14. I did finally get it to work and I am happy with it now but it was a chore to get it installed. The mount works by compressing the rubber inside the fork stem. Since the lower part of the fork stem is not reachable, they employ a “gripper” / nut holder on the bottom. The instructions tell you to “pre-load’ the assembly before insertion to make sure the gripper part is snug against the rubber so that it will remain fixed, keeping the nut from spinning when you are lightning the hex screw from the top. In practice, I could not pre-load enough to get the gripper to actually grip without pre-loading so much that the rubber was distorted in such a way that it would no longer fit in the hole.
K. K (verified owner) –
Does the job, but shakes – This will do the job, but it shakes and doesn’t hold the mounted item steady. Never seems to get tight enough.
L. E (verified owner) –
Materials – It’s a great mount and concept, but be careful installing it. The rubber holder can be torn apart by the plastic pieces that keep the nut from spinning in order to tighten the screw down onto the holder that keeps the mount from falling out. I’ll admit, it was my fault for using a plastic holder that was to small to begin with, and I wouldn’t mind ordering another one to install it properly, but feel like metal materials could work better to ensure a successful install. Having the user cut rubber to size leaves room for a lot of error.
G. K (verified owner) –
It’s a great mount besides the rubber piece to go inside – Lucky for another review that shows a better way to mount!!! The rubber insert is garbage!!!! It completely fell apart upon tightening. Luck there was a different review that showed a better way on the same bike and that works so no need to return, but if I had not found that I would have returned!!!!!!
D. R (verified owner) –
How to install RAM-B-342U for 20mm stem hole – For those reviewers saying that this product didn’t fit their bike they likely have a stem hole between 20mm-28mm. Note that out of the box the included rubber stopper WILL NOT FIT without modification. The tapered end stops at ~19mm and the large end is 28mm. You will note however that on the large end of the rubber stopper there is a marked inner ring which happens to be exactly 20mm in diameter. In order to achieve a perfect fit on my motorcycle I needed to take off the excess rubber from the large part of the stopper so that it would be the diameter of this inner line. In order to trim it I used my belt sander which took about 5 minutes to shave off the excess rubber. If you don’t have a belt sander you can likely whittle the rubber away with a knife a little at a time, checking the fit often to make sure you don’t take off too much. I left the final piece of rubber in a slightly tapered cork shape so that it would be more snug at the top. Once you have it trimmed enough so that it will slide into your fork about 1/2″ snugly by hand, measure 1″ from the end of the plug and cut off the excess rubber. Any bigger and the bolt won’t catch when assembled. Next, assemble as per the included instructions. After assembly, I was able to force the entire unit by hand about 3/4″ into the stem, after which I used a rubber mallet to gently hammer the entire assembly to be flush with the fork. Next, with the mount in place, simply tighten the bolt. I have no doubt this unit will now be harder to remove than it was to install and I have complete confidence in the fit.
K. K (verified owner) –
2013 Ducati Panigale 1199 S – I bought this so I could put a Go Pro Mount, phone, or anything else that uses a 1″ ball connector. This unit is nice, but requires you to move the top cut and bottom cut by about 1/2″ instead of the 1/8″ (per instruction verbiage). It cannot be seated all the way into the steering column because it opens up to a larger hole. Your top cut will require a larger diameter washer to hold it in place while it is tight and the rubber has expanded to hold itself in place. It actually is better this way because flush would require a further distance for your eyes to travel to see your phone. So, sitting higher and swivel it upside down will allow your phone to be very close to your display and a natural view. One last note, if it continues to swivel too easily, tighten it until it stops or put a lock washer on the top part of the long bolt that touches the plastic ball mount. Good luck!
G. A (verified owner) –
Not easily compatible with 2020 Ninja 650!!! – Not easily compatible with 2020 Ninja 650. Had to get creative with the install. Indian youtuber has a video on how to do it on his Ninja 1000 which has the same setup.
L. J (verified owner) –
I use mine for garmin zumo xt – When installing boot into fork stem use soap and water. It has play where the bolt turns in the rubber left and right but only when you move it. My garmin doesn’t move much other than that.
G. K (verified owner) –
It’s a great mount besides the rubber piece to go inside – Lucky for another review that shows a better way to mount!!! The rubber insert is garbage!!!! It completely fell apart upon tightening. Luck there was a different review that showed a better way on the same bike and that works so no need to return, but if I had not found that I would have returned!!!!!!
K. K (verified owner) –
2013 Ducati Panigale 1199 S – I bought this so I could put a Go Pro Mount, phone, or anything else that uses a 1″ ball connector. This unit is nice, but requires you to move the top cut and bottom cut by about 1/2″ instead of the 1/8″ (per instruction verbiage). It cannot be seated all the way into the steering column because it opens up to a larger hole. Your top cut will require a larger diameter washer to hold it in place while it is tight and the rubber has expanded to hold itself in place. It actually is better this way because flush would require a further distance for your eyes to travel to see your phone. So, sitting higher and swivel it upside down will allow your phone to be very close to your display and a natural view. One last note, if it continues to swivel too easily, tighten it until it stops or put a lock washer on the top part of the long bolt that touches the plastic ball mount. Good luck!
L. E (verified owner) –
Materials – It’s a great mount and concept, but be careful installing it. The rubber holder can be torn apart by the plastic pieces that keep the nut from spinning in order to tighten the screw down onto the holder that keeps the mount from falling out. I’ll admit, it was my fault for using a plastic holder that was to small to begin with, and I wouldn’t mind ordering another one to install it properly, but feel like metal materials could work better to ensure a successful install. Having the user cut rubber to size leaves room for a lot of error.